Create custom workflow in D365 X++
For the creation of Custom Workflow in Dynamics 365 F&O, Kindly follow the following steps;
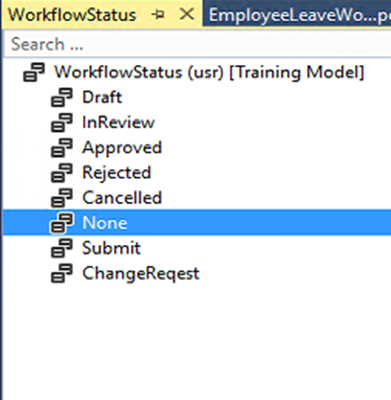
1. Create a custom Enum WorkflowStatus or you can use an existing one.
2. Create a new table EmployeeLeave as defined below and add the above Enum as a field and name it LeaveStatus.
3. Create a new form EmployeeLeaveForm by using the above table as a data source.
4. Create a new Display Menu Item EmployeeLeaveForm for the above form and add to any Module by creating an extension of the Module Menu from the application Explorer.
5. Create a new Query EmployeeLeaveQuery and add EmployeeLeave as a data source.
6. Create a new Workflow Category EmployeeLeaveCategory.
7. Create a new workflow type EmployeeLeaveWorkflowType.
• Category: Select the workflow category from the previous step
• Query: Select the query created for the document table
• Document menu item: Select the menu item for the document table’s form.
Workflow type events
• We need to handle some events for the workflow type. We will be implementing logic in all three methods.
public void started(WorkflowEventArgs _workflowEventArgs)
{
RecId documentRecId = _workflowEventArgs.parmWorkflowContext().parmRecId();
MK_WFDocument::updateWorkflowStatus(documentRecId, MK_WFDocumentStatus::Submitted);
}
public void canceled(WorkflowEventArgs _workflowEventArgs)
{
RecId documentRecId = _workflowEventArgs.parmWorkflowContext().parmRecId();
MK_WFDocument::updateWorkflowStatus(documentRecId, MK_WFDocumentStatus::Rejected);
}
public void completed(WorkflowEventArgs _workflowEventArgs)
{
RecId documentRecId = _workflowEventArgs.parmWorkflowContext().parmRecId();
MK_WFDocument::updateWorkflowStatus(documentRecId, MK_WFDocumentStatus::Approved);
}
8. Create new workflow approval EmployeeLeaveWorkflowApproval.
9. Add newly create workflow approval under the workflow type-> supported elements node.
10. Go to previously created form -> design property and set the below properties.
11. In solution explorer finds the class “EmployeeLeaveWorkflowTypeSubmitManager”.
12. Create a new method submit and add the below code. Modify the Main method also as below.
void submit(Args args)
{
recId recId = args.record().RecId;
WorkflowCorrelationId
workflowCorrelationId;
WorkflowTypeName workflowTypeName= workflowtypestr(EmployeeLeaveWorkflowType);
WorkflowComment note ="";
WorkflowSubmitDialog
workflowSubmitDialog;
EmployeeLeave EmployeeLeave;
workflowSubmitDialog =
WorkflowSubmitDialog::construct(args.caller().getActiveWork
flowConfiguration());
workflowSubmitDialog.run();
if
(workflowSubmitDialog.parmIsClosedOK())
{
recId = args.record().RecId;
EmployeeLeave = args.record();
note =
workflowSubmitDialog.parmWorkflowComment();
try
{
ttsbegin;
workflowCorrelationId = Workflow::activateFromWorkflowType(workflowTypeName,recId,
note, NoYes::No);
EmployeeLeave.LeaveStatus = WorkflowStatus::Submitted;
info("Submitted to
workflow.");
ttscommit;
}
catch(exception::Error)
{
info("Error on workflow
activation.");
}
}
args.caller().updateWorkFlowControls();
}
public static void main (Args args)
{
EmployeeLeaveWorkflowTypeSubmitManager sc=new
EmployeeLeaveWorkflowTypeSubmitManager();
sc. submit(args);
}
13. Override method “canSubmitToWorkflow” in table “EmployeeLeave”
boolean canSubmitToWorkflow(str _workflowType = '')
{
boolean ret=true;
ret=super(_workflowtype);
ret=this.LeaveStatus==WorkflowStatus::Draft;
return ret;
}
14. Set the label for all the action menu items which are created automatically in solution explorer by workflow type and workflow approval.
15. Write the below code in the “Completed” and “Returned” methods of class “EmployeeLeaveWorkflowEventHandler”.
public void completed(WorkflowEventArgs
_workflowEventArgs)
{
EmployeeLeave EmployeeLeave;
select forupdate EmployeeLeave where
EmployeeLeave.RecId ==
_workflowEventArgs.parmWorkflowContext().parmRecId();
if(EmployeeLeave.RecId)
{
EmployeeLeave.LeaveStatus = LeaveStatus::Approved;
EmployeeLeave.write();
}
}
public void returned(WorkflowElementEventArgs
_workflowElementEventArgs)
{
EmployeeLeave EmployeeLeave;
ttsbegin;
select forupdate EmployeeLeave where EmployeeLeave.RecId
==
_workflowElementEventArgs.parmWorkflowContext().parmRecId()
;
EmployeeLeave. LeaveStatus = LeaveStatus::Rejected;
EmployeeLeave.update();
ttscommit;
}
16. Save and Build your solution.
17. Open AX Client and go to Human resources-> Setup-> Human resource workflow.
18. Click the New button.
19. Click on “EmployeeLeaveWorkflowType WorkflowType”. If it is, ask for authentication and enter the current user id and password.
20. Drag “EmployeeLeaveWorkflowApproval” under the start node.
21. Drag the bottom node of the Start box to the top node of the Approval box.
22. Drag the bottom node of the Approval box to the top node of the End box.
23. Double-click on the Approval box.
24. Click Step 1
25. Click Assignment.
26. On the Assignment type tab, select User
27. On the User tab, double-click on a user to whom you want to send a request for leave approval.
28. Click on Basic Settings and then enter a subject and instructions for the approval
29. Click on Close
30. Click on Save and Close
31. Enter some notes for the new workflow if you wish.
32. Click. OK Activate the new version.
33. Enter the new record in the “EmployeeLeave form” and submit the workflow.
34. After submitting login as another user and go to “EmployeeLeaveform” and perform the leave approval action.


Comments